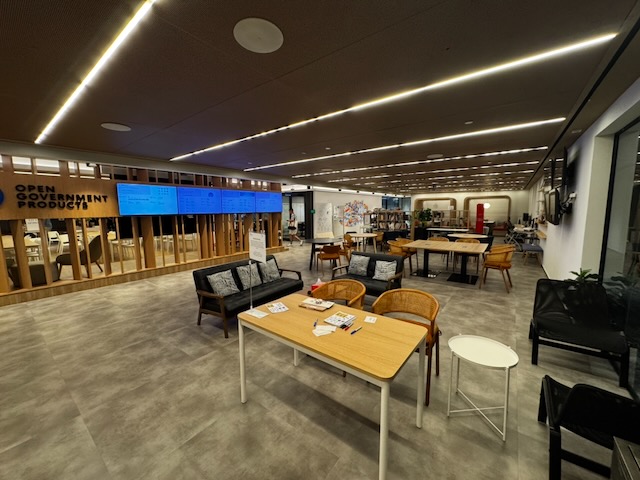
I dropped by the OGP office to meet fellow ERP X beta testers. had hoped this would be the path we took instead of the current ERP 2.0.
My sense is that ERP 2.0 is already too deeply entrenched to change course. But that is also why ERP X is a real lesson in how government should operate in a Singapore that is supposed to be agile, fast-paced, and tech-savvy.
For people in tech, this all sounds very familiar: start small, test in the real world, learn quickly, and adjust based on what you actually find. Don’t spend years locking into a system, only to discover too late what people love or hate about it.
And it is not just about the tax money spent. It is also about the time, energy, and public sector capacity that a poorly thought out half-billion dollar project consumes.
One thing I’d like to see more of is the Government running public beta programmes like this, especially for digital services and technology. There’s simply no substitute for real-world feedback from the people who will actually use the product.
I’m also encouraged to see that there are teams within Government building products with genuine pride, conviction, and a strong sense of responsibility towards taxpayer’s money.
I also shared that the traditional Government approach of awarding large, monolithic software tenders is becoming increasingly unsuited to today’s pace of technology.
Agile, experimental, user-centred ways of working should be the default, especially for projects that affect the whole country. This includes also how Government contracts vendors. If ERP X leaves behind anything, I hope it is this lesson.
Who still remembers this lion head? If you grew up in the 90s or early 2000s, you probably do. It was often found on products “Made in Singapore”. As a small nation with limited resources, we took pride in proving we could compete with the best.
Every time I return home through Changi Airport, I’m reminded of what Singapore is capable of. I can disembark, clear immigration, collect my luggage and be on my way in about 15 minutes. It feels ordinary because I got used to it, but extraordinary by global standards.
That didn’t happen because we had the best procurement process or the most comprehensive governance framework. It happened because we believed Singapore could build something better than everyone expected.
As organisations grew, so did the layers of process. Every failure led to another approval, another committee, another taskforce, another procurement rule, another governance framework. We became better at managing risk than creating excellence.
I see this creeping in our digital services.
I find the NUHS app noticeably simpler and more intuitive than HealthHub, even though HealthHub is meant to be the national platform. Parents Gateway often sends notifications that could just as easily have been an email. There’s a separate forms service for MOE when FormsSG could have been integrated. MOE Student Learning Space (SLS) is still not an app, with various seemingly valid reasons. These aren’t major failures, but they make me wonder what question we’re optimising for.
Are we asking, “what’s the best experience for citizens?”, or are we just checking boxes?
The Auditor-General’s recent report points to the same concern. Software flaws, gaps in enforcement and weaknesses in IT controls surfaced across multiple agencies.
These aren’t just isolated mistakes. They’re symptoms of large, complex organisations where process has slowly become more important than purpose.
Yesterday’s news that GovTech is restructuring and letting go of 93 officers has sparked plenty of discussion. The agency says this isn’t about AI, but about becoming more product-led and taking greater ownership of the systems it builds instead of relying heavily on vendors. I think it’s moving in the right direction. Product ownership creates accountability, and building capability inside government is important.
But restructuring alone won’t build world-class systems. Culture will.
Singapore’s greatest achievements weren’t built because someone wanted to hit a KPI. They were built because people wanted the world to look at Singapore and wonder “how did they do that?”
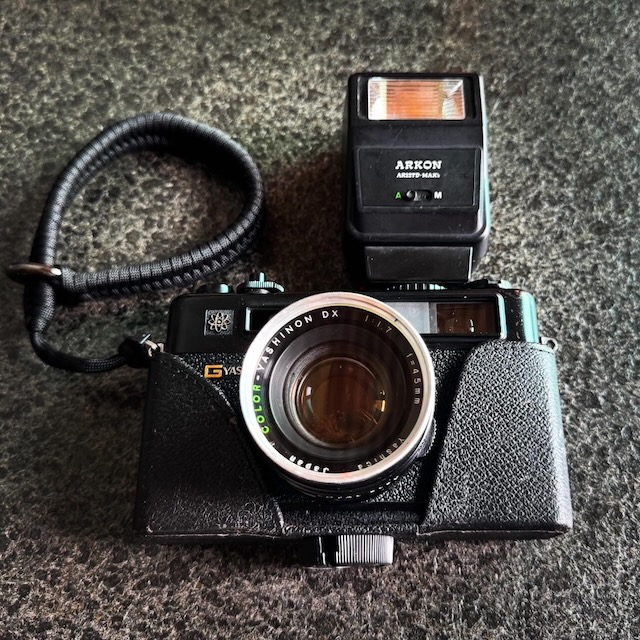
My mum gifted an old 1970s Yashica film camera. When I got it, it was all mouldy and I had to get it serviced, but after that the first roll of photos genuinely surprised me.
With a roll of only 36 shots, and a manual focus, every shot mattered. There was no preview, no delete, no room for mistakes. Every photo I took required me to slow down, become more intentional, and decide whether I should press the shutter (and many times, I didn’t)
When writing software was harder, we had to think deeply before we wrote code. Architecture mattered. User workflows mattered. Every screen, every interaction, every database table existed because someone had thought through it.
I remember the days of text-based user interfaces (TUI). Users navigated applications almost entirely with the keyboard, jumping between fields with TAB and F1-10 keys and other shortcuts. Experienced operators could enter data at astonishing speeds — it’s hard to describe and you’ll need to see it to believe it. The screens were designed with great intention because if the inherent limitations of the TUI.
Then graphical interfaces (GUIs) arrived. GUIs unlocked entirely new possibilities, but it also arguably made some software harder to use. “It’ll take time to adapt” people said, but after years, I have never seen anyone enter data that quickly, ever.
Now, the cost of adding another button, another dialog, another menu, another setting is almost zero. As software became easier to build, it also became easier to make it more complicated. Today, AI is accelerating this trend even further.
Generating code is becoming almost effortless. Creating mockups takes minutes instead of days. Entire applications can be scaffolded in an afternoon. These are incredible advances, no doubt, but when creation becomes almost free, there’s a subtle danger: we stop asking whether something should exist, because we’re focused on how quickly we can build it.
It’s easy to generate another feature.
It’s much harder to decide that a feature shouldn’t exist at all.
The same applies to user interfaces. Every additional button, every extra menu, every configuration option adds a tiny amount of cognitive load. Individually they’re insignificant. Collectively they become the reason software feels bloated.
The constraint isn’t writing code anymore.
It is the lack of intention.
Film photography taught me that limitations can improve quality because they force intention. Perhaps the future of software isn’t about who can generate the most code, but about who can exercise the most restraint.
I had an old Asus laptop that I was about to throw out, but it had a pretty decent 15.6″ FHD LCD panel that I thought would be useful, so I decided to turn it into a digital photo frame. I’m writing this blog post due to popular request, but this was done after I had already completed the frame, so not every step has photographs, regrettably.
Bill of materials (in Singapore Dollars):
Old LCD panel from a laptop, preferably 15.6-16″ – Recycle
LCD driver board – $20-30
12V 2A power supply – $4-5
IKEA RÖDALM Frame 40x30cm – $10.90
Rapsberry Pi (3B is enough) – $60
Short USB cable and HDMI cable for the Raspberry Pi – <$10
A server somewhere, or your laptop to run the FrameOS server
(Optional) Some 3D printing design skills, and a 3D printer
Total cost should be less than $120 to make this happen.
Sourcing the LCD panel from an old laptop
This project wouldn’t be financially feasible without an old LCD panel, so you’ll definitely need an old laptop to pull it out from.
The first step is to remove the frame/bezel around the LCD panel. Unfortunately I no longer have the laptop to photograph this, but it is fairly simple: on most plastic laptops, you can either find small screw covers that when removed would expose screws that allow you to pry the bezel off, or some laptops rely fully on clips around the bezel so just start prying slowly – usually from the bottom works better.
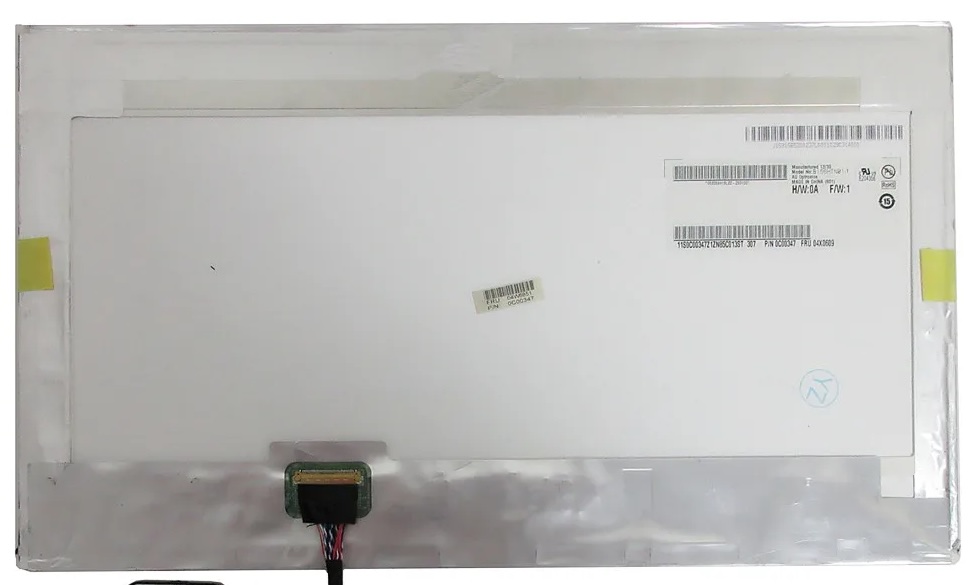
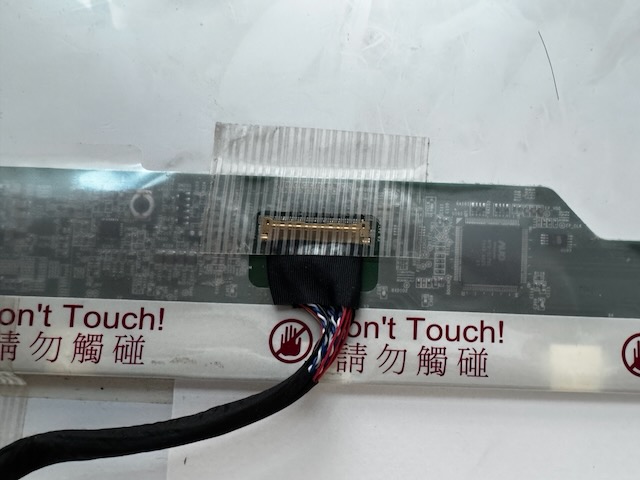
Once you remove the frame/bezel, you will see the LCD panel itself held by more screws. Carefully unscrew them – the panel is fragile, so be careful – and look behind the panel to identify the make and model of the panel. This is usually printed on a sticker or on a barcode.
Back of an LCD panel. You can usually find the make and model on a sticker/label.
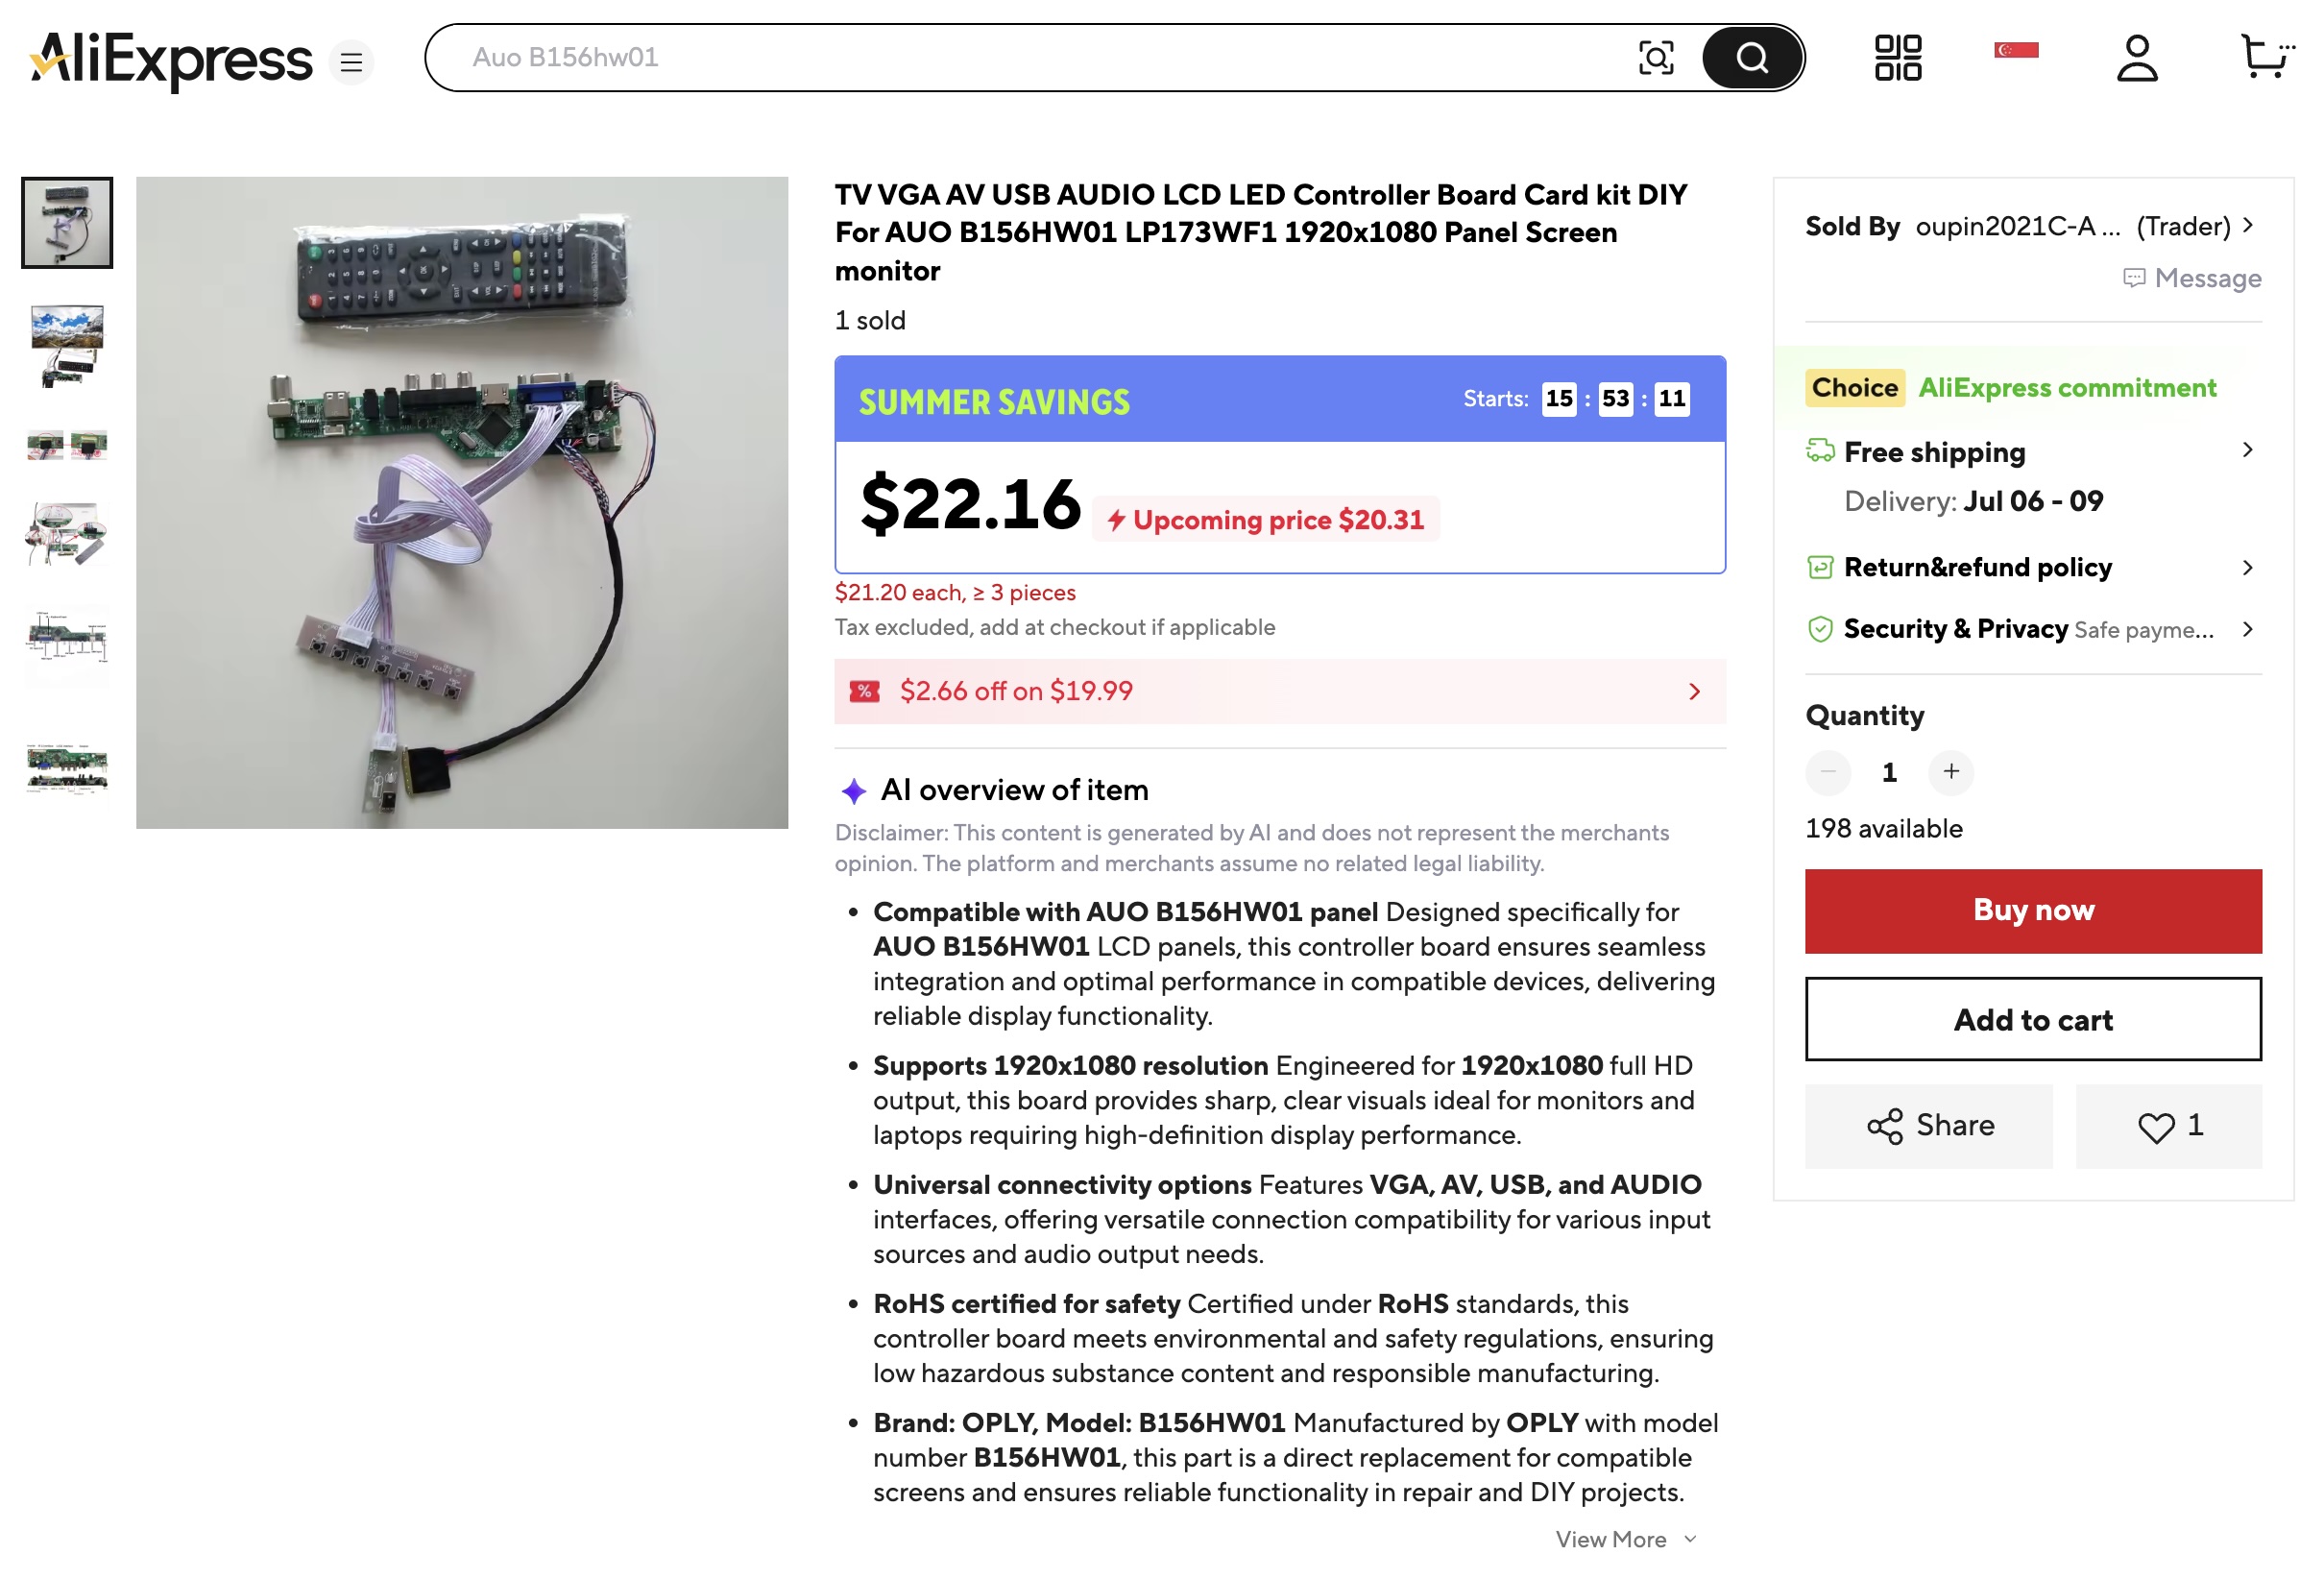
Sourcing the Controller Board for the LCD
Once you’ve identified the make and model, search on sites like AliExpress for a controller board for your panel. You’ll want a board that:
Accepts HDMI input
Has a USB port (this is needed to power the Raspberry Pi later)
Accepts a standard 12V barrel jack power input
These boards are fairly cheap, and typically run for around $20.
The controller board I bought for my LCD panel.
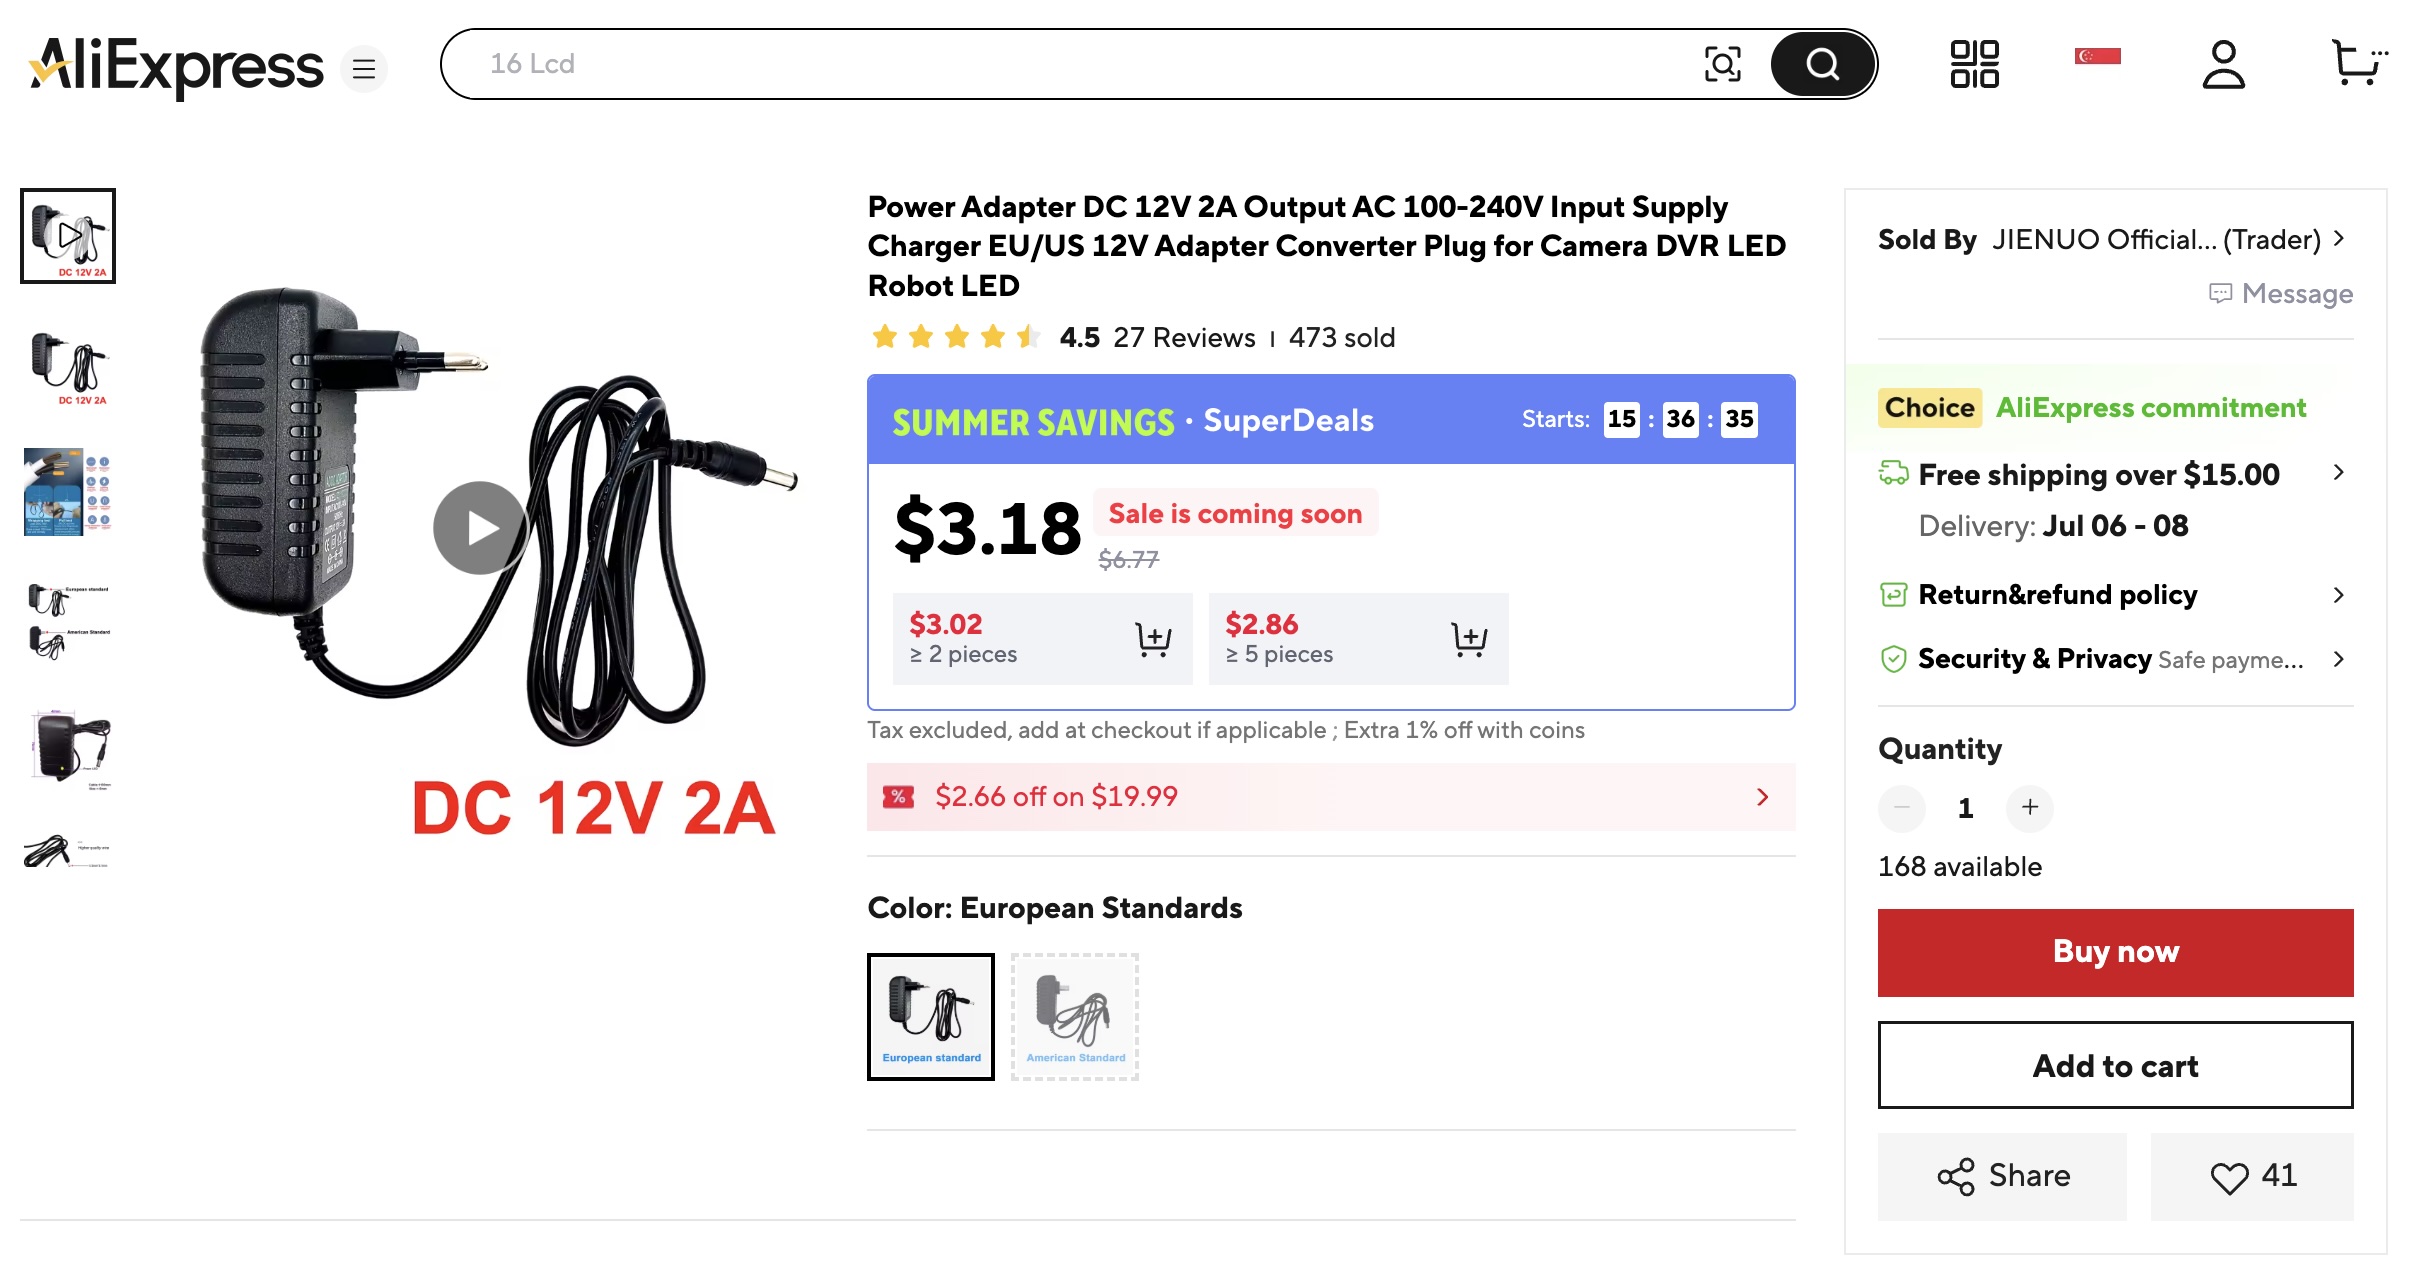
Power Supply
To drive the controller board and LCD, you’ll also need a 12V power supply. I have a bunch of these lying around at home, and sometimes you might be able to get one off an old router or home security camera. I pulled mine off an old TP-Link camera.
As for current rating, 12V x 1A (12W) is more commonly found and would work, but if you’re going to buy one, get at least 12V x 2A (24W).
Example 12V 2A Power Supply with a Barrel Jack you can find on AliExpress.
These cheap one from AliExpress can sometimes have questionable quality and ratings, so if you find one from an old reputable brand appliance – it would be better. A typical LCD panel takes about 7-10W & Rapsberry Pi takes around 2-5W, so unless everything is running at full load all the time, you should be keeping under 12W.
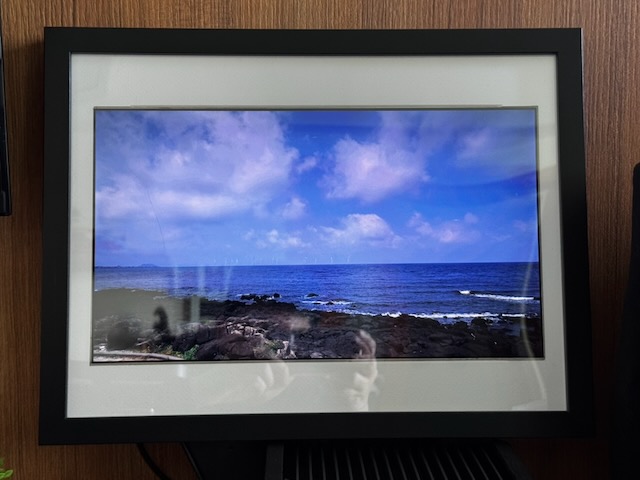
The IKEA RÖDALM Frame 40x30cm
I picked this specific frame because of its thickness to enclose the LCD panel, and this specific size because the internal height of the matboard matches the LCD panel (~20cm).
For information, the 15.6″ 16:9 LCD’s viewable area measures roughly 34.5×19.4cm. Your panel might not be the same size, so please measure it.
The internal width of the matboard is only 30cm, so it needs to be cut a little (~2.3cm more on each side).
IKEA RÖDALM Frame 40x30cm with inner cutout of matboard measuring 30x20cm.Frame after cutting out additional ~2.3cm on each internal side to width of LCD.
I also learned later that there are special matboard knives to cut the 45 degree bevel, but I already used a regular box cutter (“penknive” for Singaporeans). Not very pretty though, but probably easy enough to just replace the frame in future.
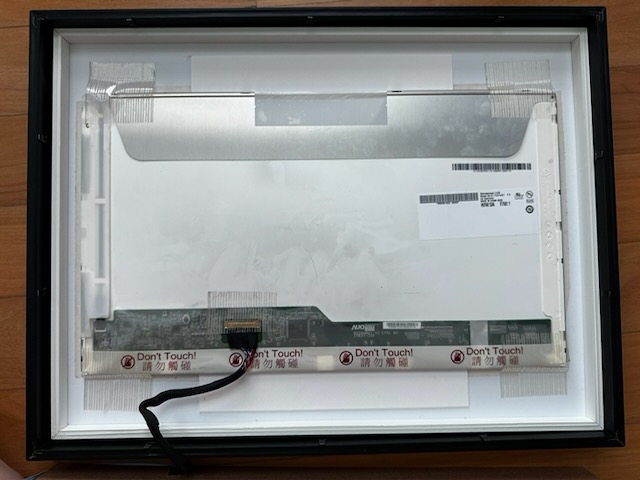
Mount the LCD on the Matboard
Using a double-sided tissue tape (this works better than regular double sided tape), apply it around the perimeter of the LCD panel and adhere it to the matboard, then add more tape behind to secure it further. I also added a cardboard (these were pieces I cut out of the matboard) at the top and bottom to keep it from sliding.
How the LCD is attached to the matboard.
Connecting the Controller Board
The next step is to connect the controller board to the LCD panel, and test it. Tape down the LCD connector at the frame to prevent it from coming loose.
Additional tape around the connector to prevent it from coming loose.
Once you’ve confirmed everything works, it’s time to close up the frame. I made a hole in the frame backing board for the LCD LVDS cables to pass through. Do leave some cable slack inside the frame.
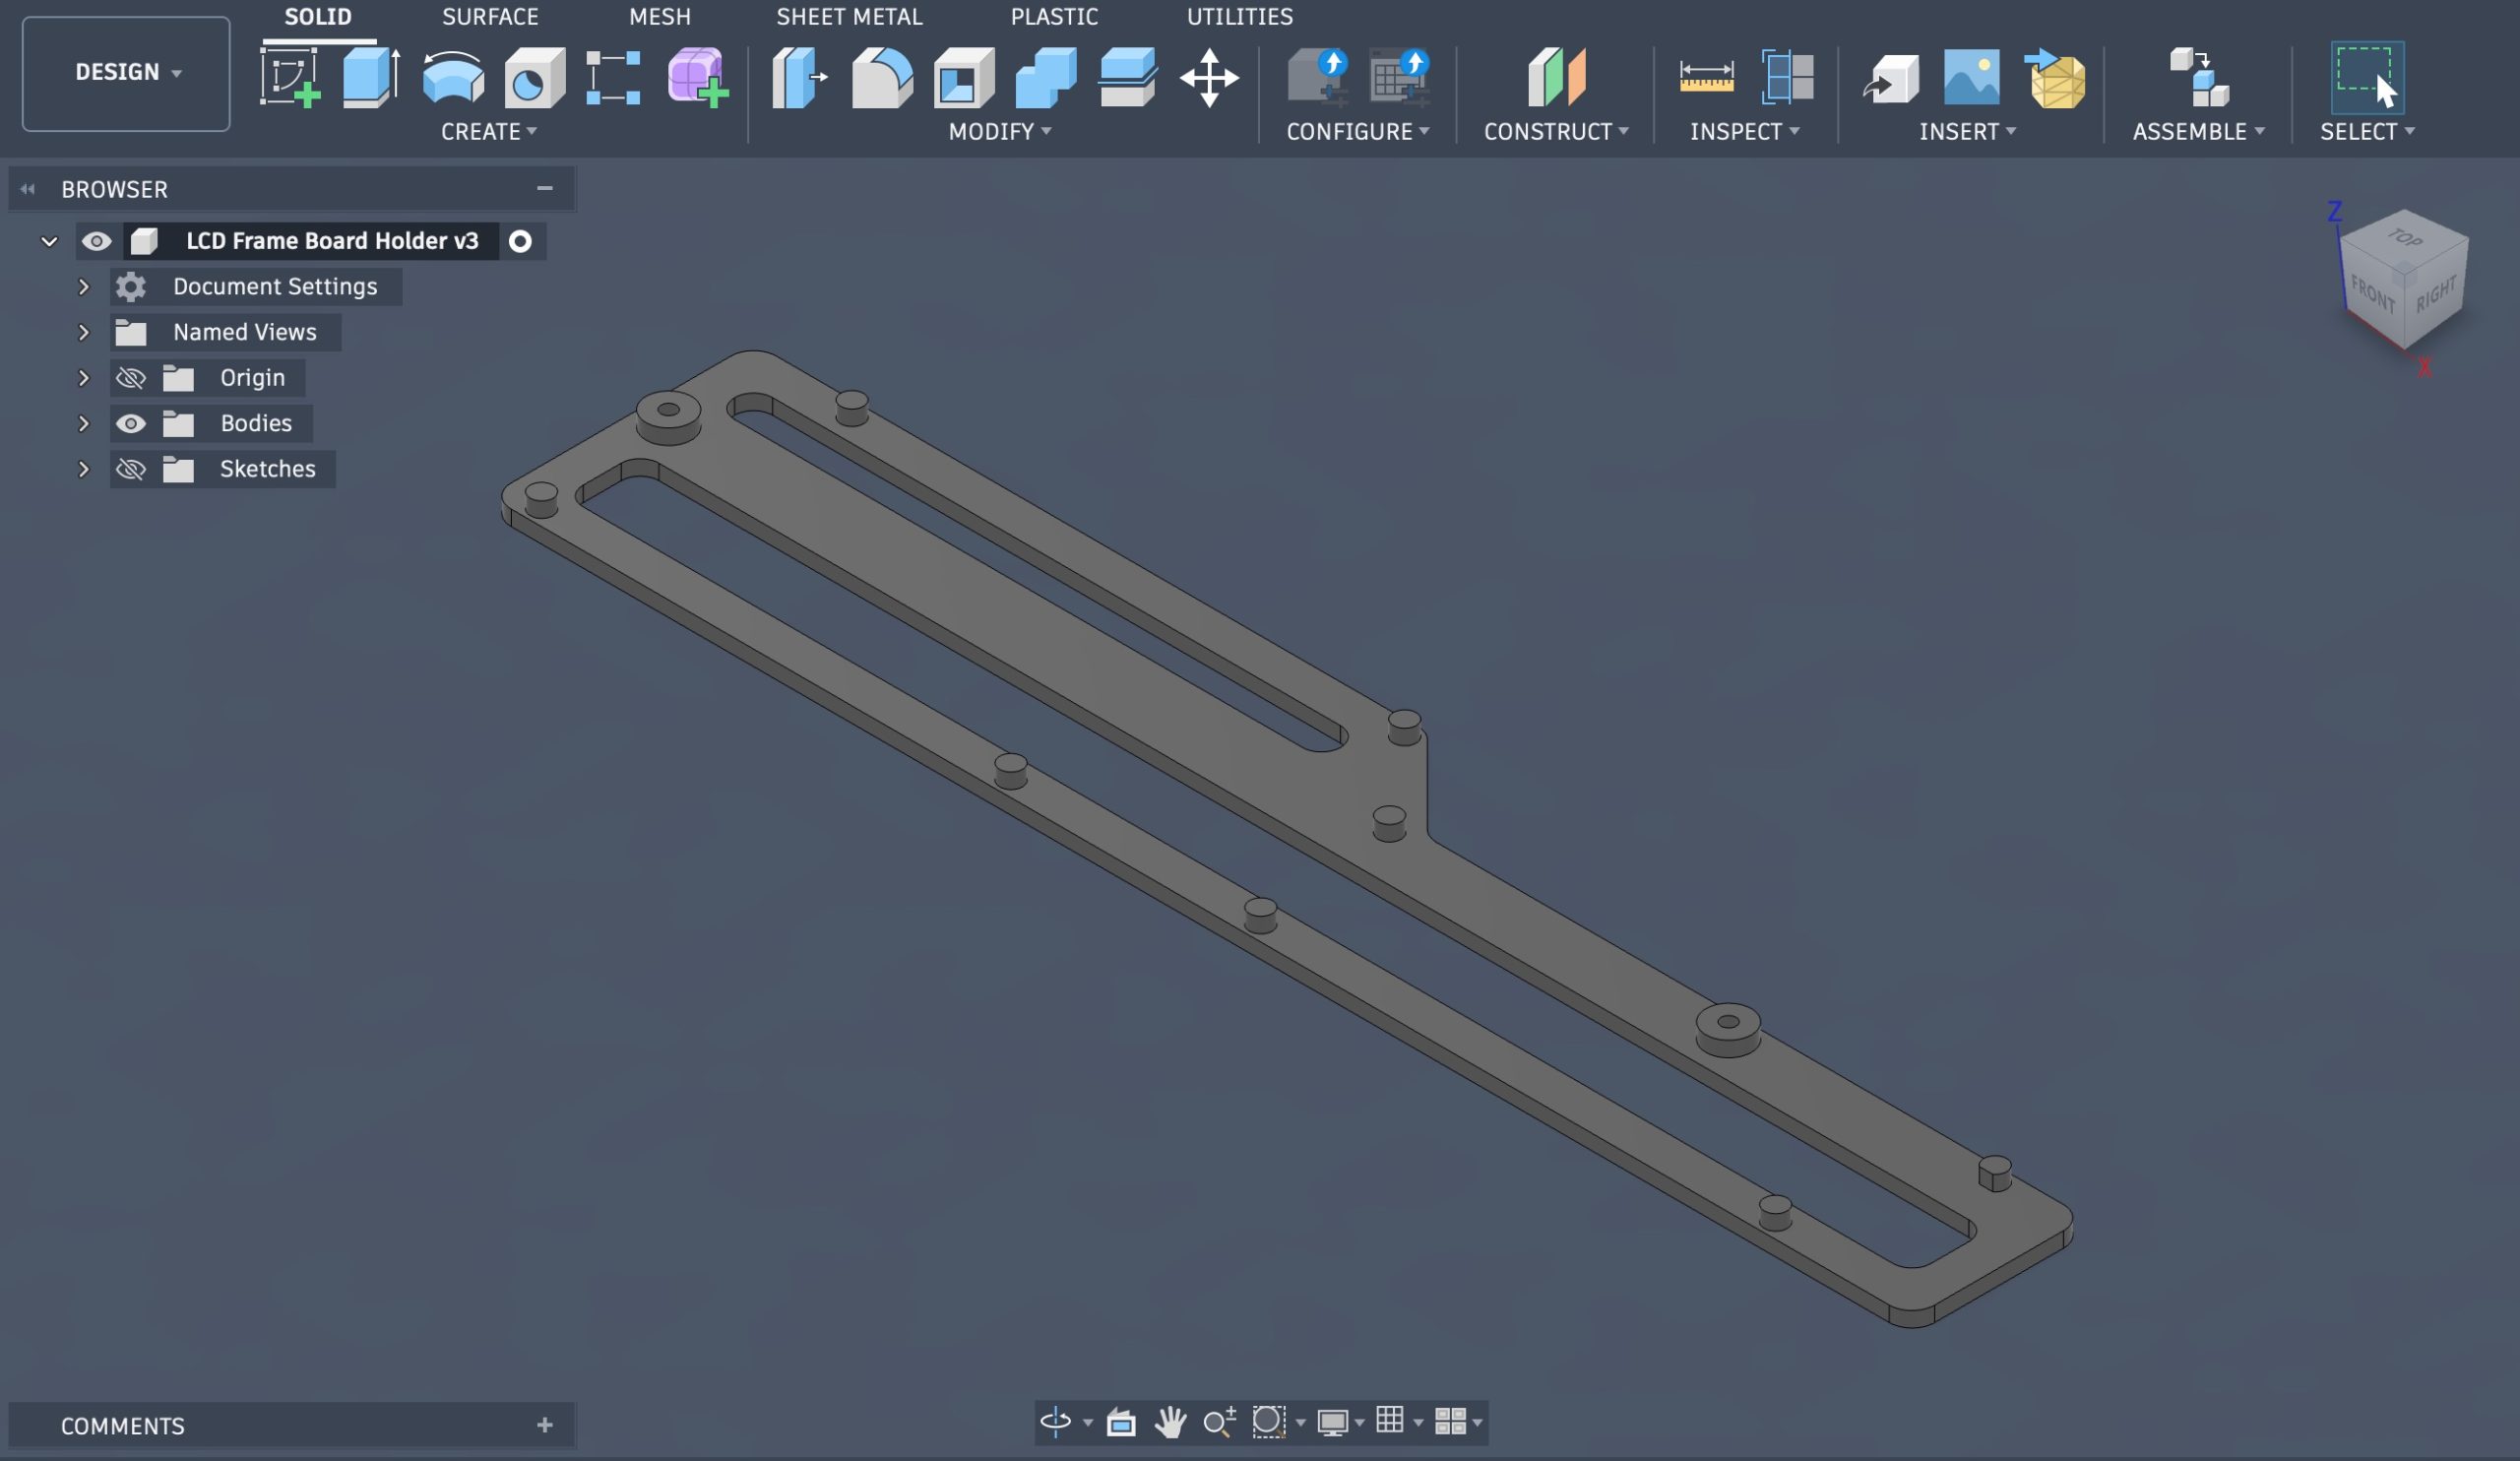
Printing a base for the Controller Board
Frankly it’s rather hard to mount the controller board with all the solder pins sticking out of the bottom, so I made a simple 3D printed base for the controller board.
3D Design of the controller board base in Autodesk Fusion.
If you don’t have a 3D printer or don’t know how to design one, generous amount of foam tape might probably work.
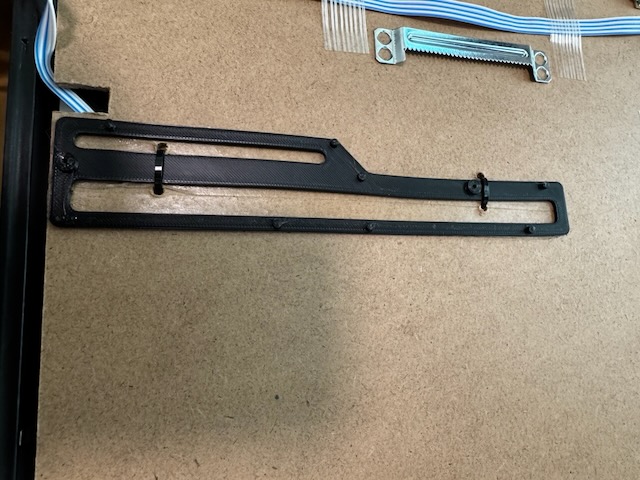
Mounting Components
The 3D printed controller board base is attached to the back with double-sided tissue tape. I later added zip ties because the heat from the board made the tapes less effective.
3D printed controller board base attached with tape and zip ties.
I also attached the buttons – menu, power, up/down, left/right for the OSD to control screen brightness, contrast, etc. to the back of the frame with the same tape.
Mounted components on the back of frame.
At the top left corner of the pic you’ll also see a small board – that’s the IR sensor for the remote control that came with my controller board. It works this way, as long as the IR can reflect off a wall behind the frame – you’ll rarely use the remote anyway.
The Raspberry Pi (white box) is secured with zip ties. You can see how I power it with the white USB cable from the controller board. The USB cable is short and tidy, but the HDMI cable is too long. I’ve ordered a short 15cm HDMI cable on AliExpress for another few dollars, and will be replacing it.
Software Selection
After experimenting with a bunch of software, including commercial with free plans and Open Source ones like DAKboard, Anthias, OpenFrame, etc. I settled on FrameOS. I won’t deep dive into why I picked it but quick summary is: DAKboard is powerful and nice, but you’ll really need to pay to get any proper use out of it. I found FrameOS (Open Source) the easiest and best for my purpose.
How FrameOS Works
FrameOS software comes in to parts: Server (aka Backend) and Client (aka Frame).
The Backend can be deployed anywhere — your laptop, a NAS, a Proxmox VE server, a Mac Mini, etc. For the more technically inclined, it’s a Docker container running a Python3 web app & Redis.
The Client is your frame which runs on regular Raspberry Pi OS. If you have ESP32 devices, it gets more interesting but that’s not covered here.
Installing the FrameOS Backend
Decide where you want to run the server. For this, I used my Proxmox VE server.
Important: If you’re using a Linux VM, allocate at least 16GB of disk space because the Docker containers need disk headroom to extract. You’ll run out of disk space with something like 8GB.
Run this command to install the FrameOS backend (in Linux):
This basically installs Docker, pulls and runs the container frameos/frameos.
If you prefer other deployment methods, such as directly running the Docker container, you can read their documentation.
Once your FrameOS is installed, you should be able to reach it at http://<FrameOS IP>:8989 from your browser. I’ll call this the FrameOS Web UI. Now, create your first user account via the Web UI, then come back to it later.
Setting up the Rapsberry Pi
The Rapsberry Pi needs nothing but a fresh install of Raspberry Pi OS Lite. DO NOT install the full OS with the GUI. You don’t need it.
When flashing your microSD with the Raspberry Pi Imager, remember to configure your Wifi and SSH settings during the process to reduce the need to configure it again later.
Once you’ve flashed the microSD, boot your Raspberry Pi, get its IP address and verify you can SSH to it.
Then via SSH, run:
sudo raspi-config
Go to System Options > Admin Password, and disable sudo password. This will prevent issues later.
Deploying the FrameOS Client
From your FrameOS Web UI, add a new frame.
Select Install over SSH.
Enter SSH connection details for your Raspberry Pi.
Select HDMI / Framebuffer as display driver.
Click Add Frame.
Click Full Deploy.
The FrameOS Backend will SSH to your Rapsberry Pi and run the necessary shell commands to install the Client packages and turn your Rapsberry Pi into a digital frame.
At this point, you might encounter some errors like I did – for some reason the SSH password needs to be entered again. Click on Settings on the left, and update the SSH password, then perform a Full Deploy again. You might still see an error, but don’t flip out. Click on Logs (on the left) and watch the installation progress.
Once the deployment completes, the Raspberry Pi automatically reboots.
You will see your frame boot up and show a black screen that says no active scene. This is when you’ll set up a scene.
Set up a Scene
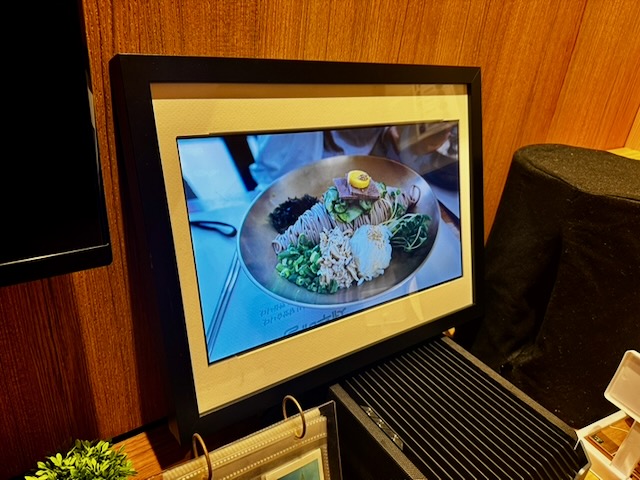
From the FrameOS Web UI, select your newly deployed frame, and add a Scene to it. I picked the provided SD card image scene. Tweak the settings as necessary, then activate/deploy it to your frame. Also click on the kebab menu (3 vertical dots) and make it the boot scene.
You can manage your assets by clicking on Assets on the left, and uploading photos into the folder specified when setting up the scene. The default is /srv/assets but it can contain a ton of other junk so I like to create a new subdirectory /srv/assets/photos and upload my photos there.
Done!
And that’s it – you have a working digital frame that can be remotely managed. One last point to note: you can turn off/shutdown the FrameOS server once the settings have been deployed. Have fun!
This video is extremely on point. I am heartened to hear that the Minister is well aware of all the issues.
It is important to distinguish between why people don’t want to have kids, versus why they don’t want to have MORE kids. I think the reasons we hear from parents about the education system is one of the key reasons why many stop at 1 or 2. Of course, housing size, general affordability, and access to private vehicle will also affect these decisions.
People not wanting to have a child altogether is — as minister points out — often a lifestyle choice. Why give up a nice (and tidy) house just for two, a car (not a minivan), annual travels instead of tuition fees, being able to easily immigrate for job growth? These all are likely reasons some avoid having children entirely.
I personally didn’t think that much, I just “went with the flow”. But I have to be very frank that if it wasn’t for my wife — and now my children — I would probably have left the country for career opportunities when younger.
That said, the points on the education system really hits home. Perhaps one thing many do not know is that the PSLE is a one-of-a-kind system in the world. No other country puts children at age 11-12 through a nationwide high stakes exam. Malaysia had something similar and also did away with it some years ago. In most parts of the world, students automatically progress to middle or secondary school without an exam. Typically, entrance exams only apply if you wanted to get into a prestigious or private school.
PSLE was devised in early post independence Singapore because we didn’t have the capacity for every citizen to have secondary education, and also because the education standard of the nation was low, PSLE was necessary as a blunt filter.
But today, after all the tweaks and adjustments to the system over decades, the system is probably due for overhaul. The idea that we should do away with it, or push it further, is starting to make more sense. Perhaps regular, smaller exams should be used more as a diagnostic exam, rather than a singular high-stakes selection/placement exam like PSLE. The subject-based banding subtly happens (as it does now at primary 4) at every stage — perhaps every year or two — all the way to JC.
The video also mentions a few important points about the post-AI world, just like the post-Internet world where I grew up in: is rote memorisation and certain knowledge skills still desirable or practical? How do we teach our next generation about creativity, cross-domain synthesis, learning to learn, judgment, morals — all the “human” things that we shouldn’t be outsourcing to AI?
Hope this email finds you well. I would like to ask MOT why our SimplyGo isn’t available as an Express Travel Card on Apple’s iOS.
If you use an iPhone and have been to other countries including Japan, HK, China, Korea and even USA, their travel cards are available in the Apple Wallet and it is very convenient.
The Express Travel Card allows it to be used without authentication (Face ID) and can even be used when the phone battery is flat. It’s designed for fast entry and exit so users can simply tap their phone without ever having to open up the wallet app and authenticating before presenting the card to the reader.
In addition, the availability of the travel card on the phone reduces the need for users to buy a physical card, or download and additional app. It’s not only more environmentally friendly – it will also be much more convenient for tourists.
I hope MOT will consider asking SimplyGo to implement the Express Travel Card on Apple’s iOS. Singapore prides itself as one of the top places in the world for public transportation, and we should keep up with the times.
For more information: https://support.apple.com/en-sg/105123