• Hacking the MiniToy 3D Printer, Part 1

    Hacking the MiniToy 3D Printer, Part 1

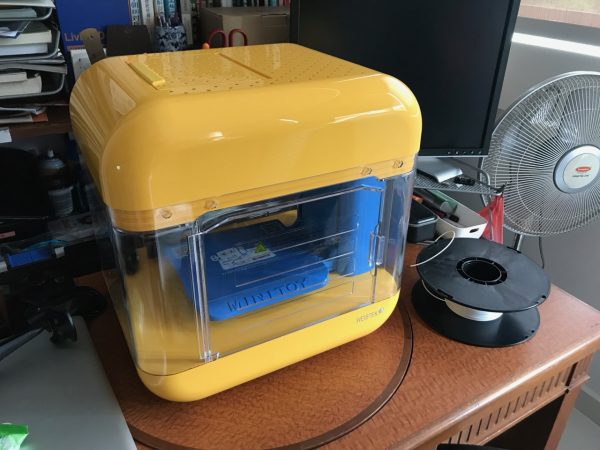
    I bought a MiniToy 3D printer a month ago (June 2019) from an online seller. This printer was part of a Kickstarter Campaign in 2016 and delivered early 2017. I believe the seller bought it and didn’t know what to do with it and kept it in the box for 2+ years.

    I did not do much research before I bought the printer, thinking I could maybe do something fun at home with the kids. Boy was I in for a ride.

    In case you are looking for the specs of this printer (and I spent time looking for detailed information and it is no where to be found, not even on the manufacturer’s website which only has basic info) here it is: –

    • Technology: FDM
    • Extruder: Direct extrusion, 0.4mm
    • Auto bed-levelling: Yes, on each print
    • Print volume: 170 x 130 x 140 mm
    • Print speed: 40 to 150 mm/s
    • Layer resolution: 0.1 – 0.2 mm (other site states 0.15 – 0.3 mm, not sure which is correct)
    • Max. temperature: 250 degrees C*
    • Filament: 1.75mm (non-proprietary)
    • Heated bed: No
    • Enclosure: Yes
    • Data interface: Wifi, SD card
    • External dimensions: 375 x 305 x 375 mm

    * I made this up because I didn’t print beyond 250 deg C

    Back in 2016, this printer might have been quite state-of-the-art. But as of 2019, you can get better 3D printers for the retail price (US$299) of the MiniToy.
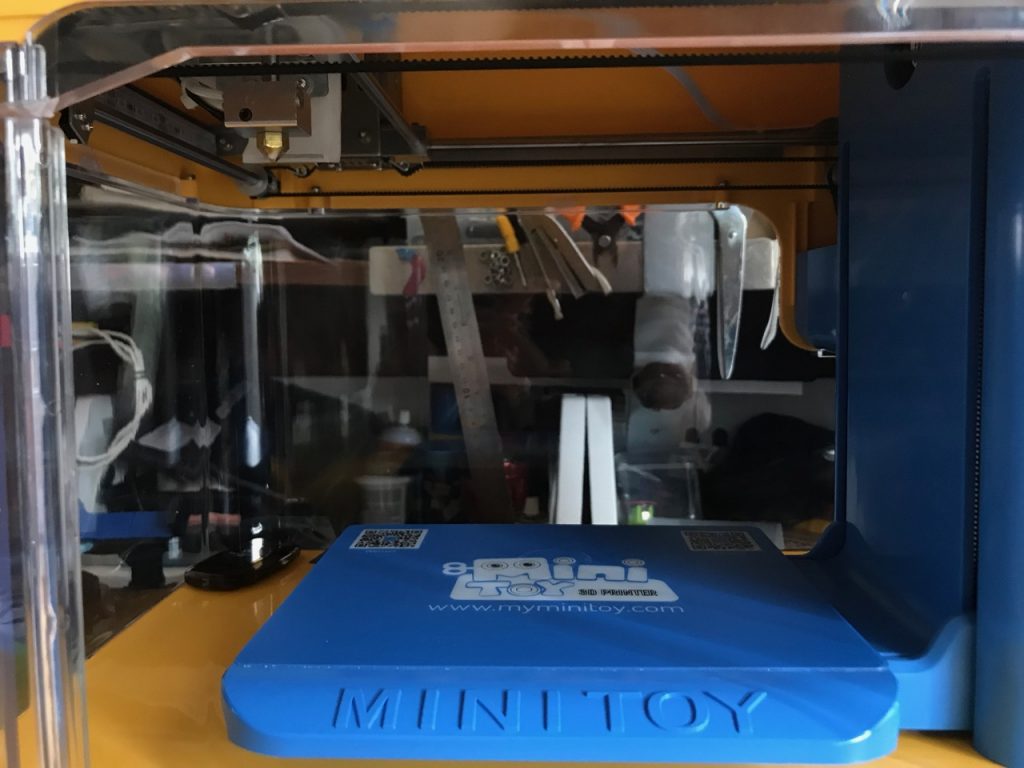
    Looking inside the MiniToy – you can see the print head on top.

    This is not my first 3D printer; I already have a Creality Ender 3 which I assembled from a kit last year. Having experience with assembly, troubleshooting, and also having some spare filament and tools, getting the MiniToy printer set up was OK, but if I was a complete newbie, this printer would have been a nightmare.

    Initial issues

    If you’re not keen on reading the setup issues, skip straight to the next section on “Hacking” the MiniToy”!

    Dangling belt. When I first unboxed the printer, I found the Y axis belt dangling off the roller. This was caused by a poorly designed metal bracket holding the Y stepper motor. The bracket probably bent during shipment, or after two years in storage under belt tension. This turns out to be a common issue as some has reported in a forum thread.

    The fix for this is to bend the metal bracket back so that it sits straight.
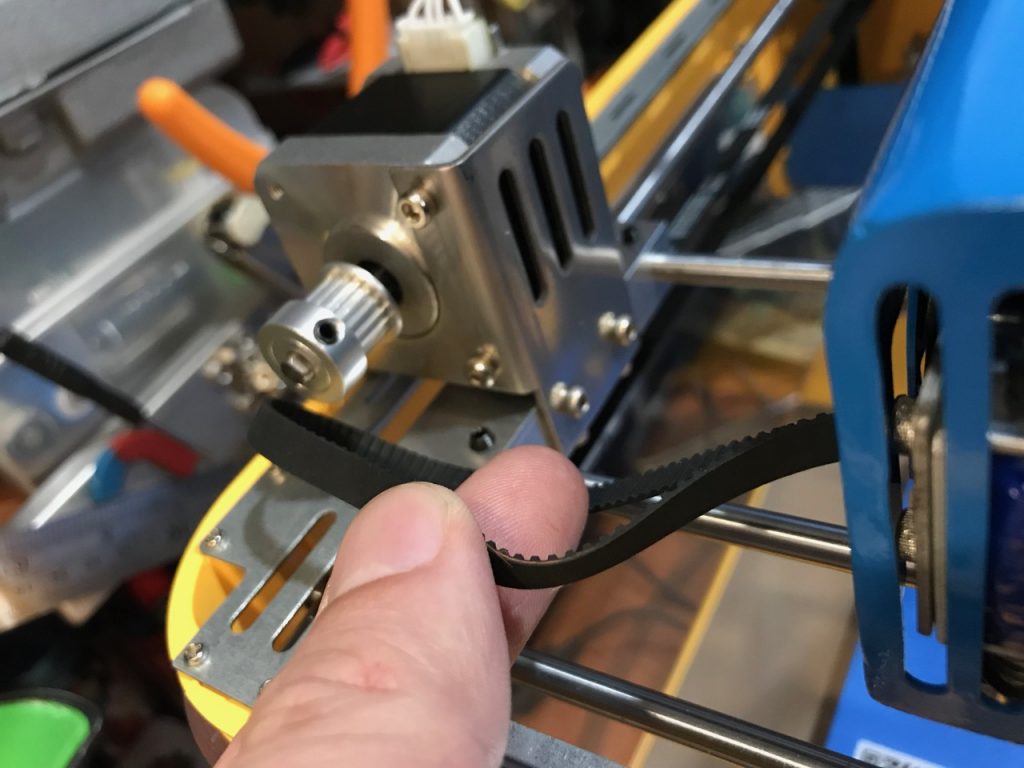
    This belt was dangling right out of the box. Stepper motor (seen behind) had a bent bracket, already straightened in photo.

    Dumbest power button, ever. This totally annoys me. They used a light-sensor as a power button! So whenever you wave something too close to the power “button” (sensor) on the left of the printer, it powers on or beeps (if it is already on). It is so fucking annoying because I regularly place things beside the printer and then it emits a loud beep and turns on. I have not actually tested if it would actually turn OFF while printing because you have to hold your finger for maybe 1-2 full seconds to turn it off. Because of this, I usually unplug the printer after use.

    SD card slots upside-down. Do not follow the diagram on the side of the printer – you will most certainly jam your SD card or break the slot. The card goes in upside down, i.e. the label on the SD card faces down and the metal pins faces up.

    Disintegrating filaments. I also found that the filaments that came with the printer had turned so brittle they were completely unusable even though I had just removed them from their vacuum-sealed bag. The filaments would break into multiple bits while you feed into the printer, and would require me to remove the feed tube that leads to the print head to remove the broken bits. I presume it was because they had been sitting for two years. Of course the fix for this would be to use a new roll of filament – I used my existing HatchBox filament which I bought from Amazon.

    Useless plastic scraper. It comes with a plastic scraper that will NOT get anything off. Do yourself a favour and buy a metal paint scraper.

    Fan noise. Yes this printer makes quite a bit of noise from the fans, even at idle! I am not sure why it would need to run fans at high rpm when doing nothing. Then there is the print cooling fan – it rubs. There is a very very tiny screw that is meant to simply position the fan, not tighten it down, and any slight amount of torque on that screw would break the fan bracket and then it would rattle in the blue housing.
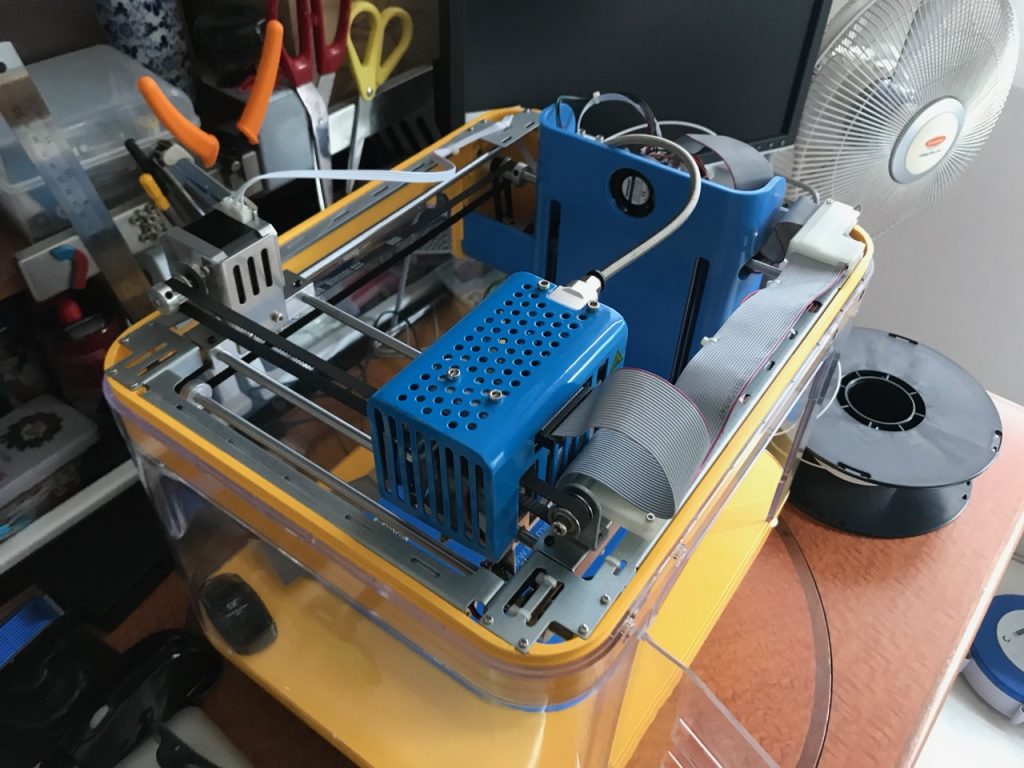
    Top cover of the MiniToy open. Shows nothing much really – the print head, extruder, fans, etc. are all enclosed in a blue housing. You can also see the filament feed tube going into the print head.

    Crappy app is the only app. This printer can only be accessed through the app, although I may have found a way to bypass it – more on this later. To get to the printer, you will have to download the app, then connect your phone to the printer’s wifi network (MiniToy_xxxx) with password 12345678.

    The app is clunky to use and looks one-off. You can upload your own .gcode files to the SD card, but you will still need to use the app to print it. Another blog actually documented the process to print your own .gcode files.

    Calibration, or mis-calibration? The app has a calibration function and I do not understand how it works. As with most Chinese made software, the English instruction/description sucks. It took a bit of fiddling – or I would actually say guesswork – to find the correct setting.

    • How I thought it works: For some reason during the calibration process it raises the bed and then leaves a super wide gap from the print head. I thought what I needed to do was to get the bed to almost touch the print head with a “paper-thin gap” – similar to how I would have done a manual bed levelling for my Ender 3 – but when I did that, the printer was slamming the print bed into the head.
    • How it actually works, after lots of agony: You basically let it do it’s thing, save, and then go do a test print. If the print does not stick well because it’s too far from the bed, redo the calibration, raise the bed 0.1 mm and retry print. If the print head seems to be rubbing on the print bed, then redo calibration and lower the bed by 0.1 mm and retry print. It’s a slow and painful process.

    Auto bed-levelling accuracy. Once I started printing, I also found that the auto bed-levelling measured one quadrant of the bed 0.1mm too high so my prints do not seem to stick in that area (this is where manual bed levelling may be better). Turns out this was because the bed-levelling mechanism had some free play in it which is resolved by tightening some nuts, straightening a slightly bent piece of metal for the arm holding the switch/sensor and maybe adding a bit of tape to the base of the print bed.

    What’s with all the bent metal?

    “Hacking” the MiniToy

    I refrain from using the word “hacking” because I don’t think this is really hacking, but you know – buzzwords gets clicks.

    Naturally, I got fed up with the crappy app, so I wanted to find out if I could interface directly with the MiniToy from a computer, or print from something like OctoPrint. Here are few discoveries I have made.

    TCP port 8888 – serial interface. I found this by capturing packets from my iPhone to the printer, and saw that the app communicated with the printer on port 8888. The data stream looked like raw serial commands. I believe it is highly possible to send gcode to this port to get the printer to print directly without depending on the SD card. I have yet to test sending a print through this port; however I would also like to highlight that this port is unauthenticated, and since the wifi password is also standard and can not be changed by the normal user, this is actually a security risk, i.e. anybody within wireless range can hijack your printer, and can, for example, cause a fire by overheating your printer.

    … this is actually a security risk, i.e. anybody within wireless range can hijack your printer, and can, for example, cause a fire by overheating your printer.

    TCP port 80 – HTTP server. I connected a computer to the MiniToy wifi network and then hit http://192.168.0.100 (the IP of the printer) with a browser. I was presented with a HTTP Basic authentication prompt. I haven’t had time to try to brute force this and would appreciate if anyone with info to share this with me.

    Sorry, kid’s crying again. 🙁 Gotta go. Once I have more updates on my progress on the two ports above, I will write part 2 of this blog.

  • 10 years have passed

    10 years have passed

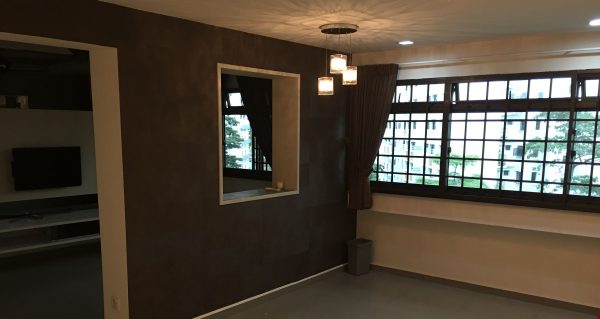
    2019 marks the 10th year since my first property purchase – a resale HDB in 2009 (image above of my vacant HDB before I sold it). Back then, the supply was extremely short, and after several failed BTO attempts and skyrocketing prices month after month, we bought a resale flat in Bukit Panjang from the open market.

    “I thought that would be my first and last property.”

    I thought that would be my first and last property. I dreamed my home as a place for me to unwind from the hustle and bustle; a place where I could sit in a corner and read a book, or listen to music, or tinker with my hobbies, or write code. Never did I know I would eventually spend 6 years living in agony with a noisy neighbour upstairs, and later on also another one next door – yes TWO noisy neighbours, what luck?

    As a musician, I am extremely sensitive to sounds. It seemed almost impossible for people to understand how much sound noise would affect me. I was frustrated and stressed because the noises from the neighbour upstairs would persist late into the night (3am~4am). I had interrupted sleep several times a week, which then affected my health and work. My blood pressure regularly rose above 140/100. At a certain point I was even depressed. I spent a lot of time and effort trying to retaliate, because the police, MP, etc. were of no real help – retaliating was the only way I could get peace for a short while before the noises returned. But retaliating took effort, energy, anger, time – which was supposed to be when I should be relaxing, recuperating, meditating, sleeping. I was at such wits’ end that I even started a Facebook page “Singapore Noisy Neighbours” which got 100+ members sharing similar issues, but even with so many of us, none of us had a solution because there are no real laws on our side.

    I was thankful, though, that during this period the people who could help did come forward to offer their help. However all the help eventually still led to the police, MP, HDB and mediation – which were mostly useless.

    “Why do I have move, to suffer the consequences twice as a victim?”

    I was told to sell my HDB, to move away from this madness. I couldn’t believe it: why do I have move, to suffer the consequences twice as a victim? The HDB resale market had already started to dip in 2013 thanks to the cooling measures. I already spent my life savings (at that point) buying the house and renovating it. I may not recover the costs of my renovation, which was modest by modern standards ($40K).

    But I couldn’t take it anymore – in 2013, the 4th year of my ownership, before the Minimum Occupation Period (MOP) of my HDB – I wrote in to HDB to request for a waiver of my MOP so I could sell. HDB approved my request, but with many preconditions, such that I could not choose anything other than another HDB within Bukit Panjang. Part of the reason was because I had obtained several grants, including one for living near parents.

    I had almost given up, until one day I saw a Facebook advertisement for learning how to “invest in properties”, how to “buy 2 condos with no cash”, how to “earn passive income”, how to “retire early” – it sounds like a total scam, but I was already hopeless, tired and vulnerable. I went for the free “preview”, and then later paid $3,000 for the “course”.

    I always believed I had to be debt-free, cash-rich and would pay of my HDB and then accumulate cash to retire…

    Turns out this “scam” was the best $3,000 spent, because I saw through some of the scammy bits of it, and took in the other non-scammy bits. The “course” mainly taught how to manage credit-worthiness and how to properly apply financial leverage – which are key to property purchases. I always believed I had to be debt-free and cash-rich; to pay of my HDB and then accumulate cash savings – but I wanted to move so badly that I convinced myself to buy a condo, and because I now believe strongly in the potential demographics of my neighbours, I picked a prime area. My parents thought I was crazy to pay $1,500psf for a tiny unit. Coming from Malaysia where they grew up in landed houses, they were in disbelief that I would pay such hefty prices to squeeze my family in a tiny space.

    After settling down from my first child in 2015, I started planning and sold my HDB plus many of my large furnitures in 2016. I rented an apartment from a friend for a year while I searched for a new home. It took me almost 3 years of planning, relocating twice before settling down in my current condo in 2017. I never looked back; apart from finally having my deserved peace, the location is fantastic, and the vicinity around the property is beautiful. There are also dozens of childcare centers with vacancies around my area.

    All I need now is a house full of people, not a house full of things. There’s a world out there. The Singapore life is all about a city life.

    I then realised that I don’t need to be at home to do the things I want to do, and I really don’t need a big house: when I was young, a huge part of my room was occupied up by bookshelves and computers. Now that almost everything is digital and computers are tiny, we start to fill these spaces up with modern day consumerism – branded goods, useless gadgets, etc. All I need now is a house full of people, not a house full of things. There’s a world out there. The Singapore life is all about a city life.

    I’ve started recycling my daily waste too, cleaning and sorting them into paper, plastic, metal and glass – because the limited space I have forces me to get rid of packaging material, boxes, containers, etc. that I might otherwise keep. Doing so also makes me more conscious of the amount of waste we are generating.

    I’ve also spent a lot of effort on decluttering – way before Marie Kondo.

    So what have I learnt in 10 years? Less is more.

    P.S. This story also explains why I hate open concept offices – noises affect me a lot.

  • Why it is not OK to lose blue collar workers

    We’re losing talent, and I think blue collar workers play an important role in our economy to produce quality work. Keeping local blue collar talent costs money, and will drive up costs of living some, but that is how things will go, especially if we want to continue to enjoy a good quality of life. People like aircon technicians, car mechanics, plumbers, etc.

    If we ignore this segment of people, sooner or later we will suffer. They say automation will replace these jobs. That’s bullshit. Robotics and automation has long ways to go before it can replace your plumber or aircon technician or mechanic. These are skilled work that is almost like the work of art. Why does the BMW factory continue to employ so many workers to build mass produced cars like the 5 series? Watch this video to understand.

    I believe one day — and the day will be soon enough — that a plumber is paid more than a developer.


  • What do we plan for?

    What do we plan for?

    Life… can be unpredictable. We make plans, we make decisions. How do we know if they were for the better?

    Only time will tell.

    Most people plan financially. It’s hard to admit it, but it’s probably the only thing we have ever really spent time planning for. How many people make more plans for their health or family than their finances? Not many. Not yet. Not at my age I don’t think.

    As age passes, I realize how important it is to spend more time with family. And also friends, of course. When I got married and bought my HDB as a young teenager, I couldn’t wait to get out of my parent’s house. I mean, every kid does, right? Parents are naggy and annoying. But ever since I had a kid, I went home every weekend so that my parents could see the little one, and it is also sort of a childcare break for me and wife. November 2015, grandma passed away. Towards the end of 2016, my dad had a pretty big heart op, and that’s when I start to realize, hey this man is getting old. You know, there’s only 52 weekends in a year.

    Money is evil. It really is. People get obsessed with it. I’m no saint either. You get some, you want more. You get more, you want even more. People spend a lifetime in search of more money. But, really, money is just an enabler. Once there’s enough to go around, the excess is just… really… excess.

    I know it’s easy to say that once we actually have money. And when we don’t, shit goes bad pretty quickly. We spend all our time trying to fix the lack of it. We get so absorbed into it that at a certain point, amongst the chaos, we will most certainly make bad decisions. That’s why the rich gets richer, and poor gets poorer.

    So I spent the last two years chasing after money — not for me, but for the company. Across my desk are two colleagues… well, friends. Old friends. Both whom I’ve asked to join the company because I thought I saw a better future for them and I believed they could do better. I’m no Bill Gates. I can’t change a million starving kids’ lives. But maybe I can help those around me.

    After years operating as a cost center, salaries have been pretty stagnant. We didn’t really pay very well to start with. I don’t want them to feel like I dragged them from one shithole to another shithole. They both have kids, and I know it’s not easy. It’s about time to turn over some profits.

    Those who know me know I hate doing sales. I’m no sales guy. I’m too honest. Too practical. Too straightforward. I can’t say yes to shit and then let the money do the talking. I hate clicking through shitty-ass bidding sites. I hate writing proposals. I hate doing cost calculations and currency conversions. I hate Microsoft Word, Excel and Powerpoint. I hate sitting in a room with pointy-haired bosses “talking business” for hours. I irritate the shit out of sales people too, because I tell people their shit sucks when it really does. That’s why I am a techie. But I did it anyway and took it as a challenge. I will be lying if I said I haven’t learnt anything new.

    So, we tried to be profitable for about 2 years, maybe coming 3 years. Then comes the 2017 year end review: It wasn’t too good. So-so. We tried our best, we won some, we lost some. But the good news is that there’s finally some money to go around for bonuses and pay raises. As the local “boss”, I had the discretion to allocate… as much as I wanted to myself! Haha.

    Nah, I did not. I gave out most of the allocated budget. I believe that the extra money would take some distraction off them, so that they can focus on work, family and friends. I know money is evil, so I try not to make it evil.

    Did this silly idea of mine really help them? Or maybe they were better off doing what they used to do? Only time will tell, I guess.

  • Where is COE headed in 2018?

    Where is COE headed in 2018?

    Several car salesman told me: “Next year price will go up! Buy NOW!”

    Well done. All the fear mongering will actually lead to a COE plunge. There was a run up prior to the end of this year because of all the panic buying, then it will stop as people adopt a wait-and-see attitude. By then, the car salespeople will tell you that COE is low, and it is the best time to buy. No matter COE high or low, they will spin a story to sell their cars.

    My guess is that sometime in Q1’18 will be the best time to renew COE, where it should plunge back to $40K or even $30K+ levels (for Category A).

    Yes, the new Euro 6 CEVS will affect car prices, but the market will adapt. It’s not like this is the first time the Government has introduced changes to CEVS or COE (e.g. the horsepower categorisation). Eventually the whole system will net itself to zero, i.e. COE drops + CEVS goes up. Car prices will probably just remain the same, and for a while until manufactures catch up with Euro 6, then the regulations will likely change again when majority of vehicles qualify for CEVS discounts.

  • Raspberry Pi print server with no server-side driver

    Raspberry Pi print server with no server-side driver

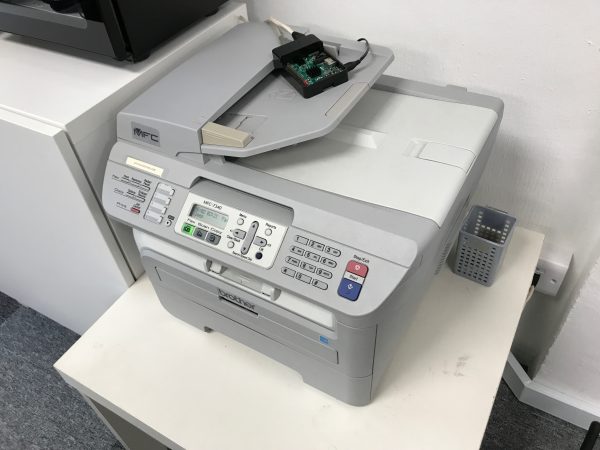
    There are numerous articles which step through how to configure CUPS to turn an RPi into a print server but I bumped into a problem because there are no drivers available for my Brother MFC-7340 printer for ARM (only available for i386) and I was not keen work on the source code/compile/etc.

    The quick fix is to turn it into a RAW (a.k.a. HP JetDirect) print server.

    Install CUPS

    sudo apt-get install cups

    Configure CUPS

    Edit /etc/cups/cupsd.conf.

    Scroll down until you see the Listen configuration directive. Comment it out. This will make CUPS available over the network.

    # Only listen for connections from the local machine
    # Listen localhost:631
    Port 631

    Look for the <Location /> directive, and add Allow all (or a specific list of IPs, if your local network is not secure) to allow access.

    <Location />
      # Allow remote access...
      Order allow,deny
      Allow all
    </Location>
    

    Save the file and restart CUPS.

    sudo /etc/init.d/cups restart

    Configure Printer

    Now connect your printer to the USB port on the RPi.

    Now you should be able to use a browser and go to https://<ip.address.of.rpi>:631/admin to reach the CUPS web UI.

    1. Under Printers, click Add Printer.
    2. You should see your printer appear under Local Printers. Select it and click Continue.
    3. You can accept the default names on the next screen and click Continue.
      • You do not need to enable Share This Printer.
      • Make a note of the printer Name. You will need this later.
    4. In the next screen, click on Select Another Make/Manufacturer.
      • Select Raw and click Continue.
      • Select Raw Queue (en) and click Add Printer.

    Install xinetd

    sudo apt-get install xinetd

    Configure xinetd

    Edit /etc/services and scroll to the end. Add the following line:

    jetdirect 9100/tcp

    Create a new file /etc/xinetd.d/jetdirect and add the following, replacing Brother_MFC-7340 with your printer name configured in CUPS above.

    service jetdirect
    {
    socket_type = stream
    protocol = tcp
    wait = no
    user = root
    server = /usr/bin/lp
    server_args = -d Brother_MFC-7340 -o raw
    groups = yes
    disable = no
    }

    Save the file and restart xinetd.

    sudo /etc/init.d/xinetd restart

    Connect your computer

    Now, go to your computer and connect to the printer. These are steps for Macs.

    • Go to System Preferences > Printers and Scanners.
    • Click on [+] to add a new printer.
    • Select IP
      • Address: <ip.address.of.rpi>
      • Protocol: HP JetDirect
      • Queue: <Blank>
      • Name: Enter a name of your choice here, e.g. Office Printer.
      • Use: Click Select Software and use the correct driver for your printer here.

    You should now be able to print to the new printer on your Mac.

    P.S. Sometimes you may need to connect your printer via USB to your Mac so that it installs the correct drivers first, then you can unplug the USB and select the drivers when configuring IP printers.