The battery on my MacBook is dying so I decided to just take it apart. You know, nothing stops my curiosity. I love taking things apart ever since young, though I wasn’t able to put most of them back together… last time. Hopefully, some things improved.
Of course, I’ve paid for my curiosity with nasty shocks – just last week, I got a nasty zap from a flash capacitor inside my Canon Powershot A70. I got so pissed I just shorted the capacitor to get rid of the current in it. Some months ago, I got super freakin’ zapped by the household 240V AC current while taking apart a Sun PSU. The house tripped.
Actually, this MacBook belongs to my sis, but she hated it so much so I swapped my laptop with hers, so technically, I’m taking apart her battery.
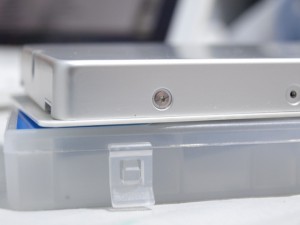
Anyway, here’s the takeapart journey. Small torx screwdrivers are needed to remove all ten screws on both sides of the battery.
Once those are removed, the aluminum cover should come off by gently prying them off. There’s some sticky substance holding them down, so expect some resistance.
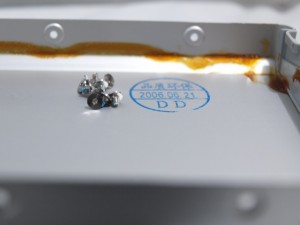
Right under the cover there’s a QC stamp with Chinese words and the date of manufacture. Notice also the blue substance on the threads of the screw. That’s threadlock – a liquid substance that prevent screws from coming loose under vibration.
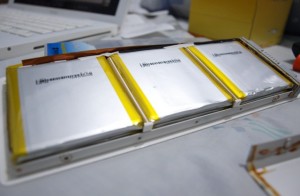
Removing the cover reveals neatly packed lithium polymer cells in rows of threes. There’s two rows of them here, making this what’s commonly known as a 6-cell pack.
Looking closer, I was quite surprised to see that the cells were actually made by ATL with the part number 606168. These were compatible alternatives to the Sanyo UPF606168. According to Sanyo’s specs, these cells should be rated 2500mAh and charged at 1750mAh (0.5C).
Most people have a misconception about cell counts. The number of cells doesn’t really matter. What really matters is the battery’s total capacity in Ampere-Hours (Ah), and also its’ discharge rating in Coulumbs (C).
The higher the rated capacity (Ah), the longer the battery runs. The higher the discharge rating (C), the more load the battery can take. Batteries with high capacity and discharge rates are most favorable not only for extended run time, but also for longer battery life. This is because smaller loads (relative to the battery’s rating) put less stress on the battery.
Unfortunately, most laptop batteries have low discharge ratings not exceeding 2C, so the only thing we can do to help ourselves is to buy batteries with higher capacities.
The MacBook battery is rated 11.1V, and each lithium polymer cell is rated 3.7V, so that means the cells are wired 3 in series (11.1 / 3.7 = 3). Since there are 6 cells, that means it’s wired 2 in parallel (3 x 2 = 6), totaling the capacity to 5000mAh (2500 x 2 = 5000). In short, this circuit layout is known as 3S2P. It’s not wired in this manner for fun – cells in series adds voltage, whereas cells in parallel adds capacity.
So a 6 cell pack doesn’t mean it’s 3S2P, it might be 2S3P (less voltage, more capacity), or simply 6S1P (more voltage, less capacity). Some notebooks like my Dell Vostro 1310 supports running on different cell voltages (3S or 4S). So, always check the mAh rating when buying a battery!
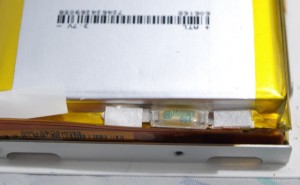
It also seems that there’s individual Matsushita MU092X thermal cutoffs on each cell as a safety feature. This is the major difference between lithium polymer cells for RC hobby and consumer electronics.
Hopefully cells with safety circuits will find their way into the RC hobby soon. The major challenge is to withstand high current that RC crafts demand. Some huge RC helicopters and planes demand power ratings of up to 50A – way beyond the rating of the thermal cutoffs and the thin wires inside the MacBook battery pack. Heat dissipation is also a major issue. Batteries for RC crafts get as hot as 70 degrees Celsius in flight.


July 18, 2018 at 2:49 pm
Just FYI for those who attempt this… Most newer Mac book batteries have similar cells, they look almost exactly the same. They are just 1/4″ wider.
Those cells are the same 3.7v but they are 11Wh (watt/hours), about 3000mAh cells. Doesn’t sound like much of an improvement, but this gives you +20% capacity and discharge/ charge rate.
So if you decide to replace a pair of bad cells, or use the remaining good cells for hobbies, cheap this in mind and watch for the cells expanding. They are known for this, but can be deflated as long as you are careful and let as little moisture and oxygen back into the pouch before sealing up the pin hole you need to make to deflate the cell.
Great write up, thanks for the info on the sanyo cells, that’s how I found this page.
August 30, 2009 at 1:55 am
Also, what is the Torx screwdriver size that you used? Is it T1, T2, T3, or bigger? Please let me know so I can order the correct size. Thanks again!
August 30, 2009 at 3:43 am
It’s T5, I think. Why not just get an entire set of torx screws? You might need it for many other things.
August 30, 2009 at 1:53 am
Very nice review! I just happened to have a dead battery today and found your site. It is very helpful! Thank you! 🙂